What Are Crown Moldings and Why Do People Install Them?
That One Detail That Changes Everything
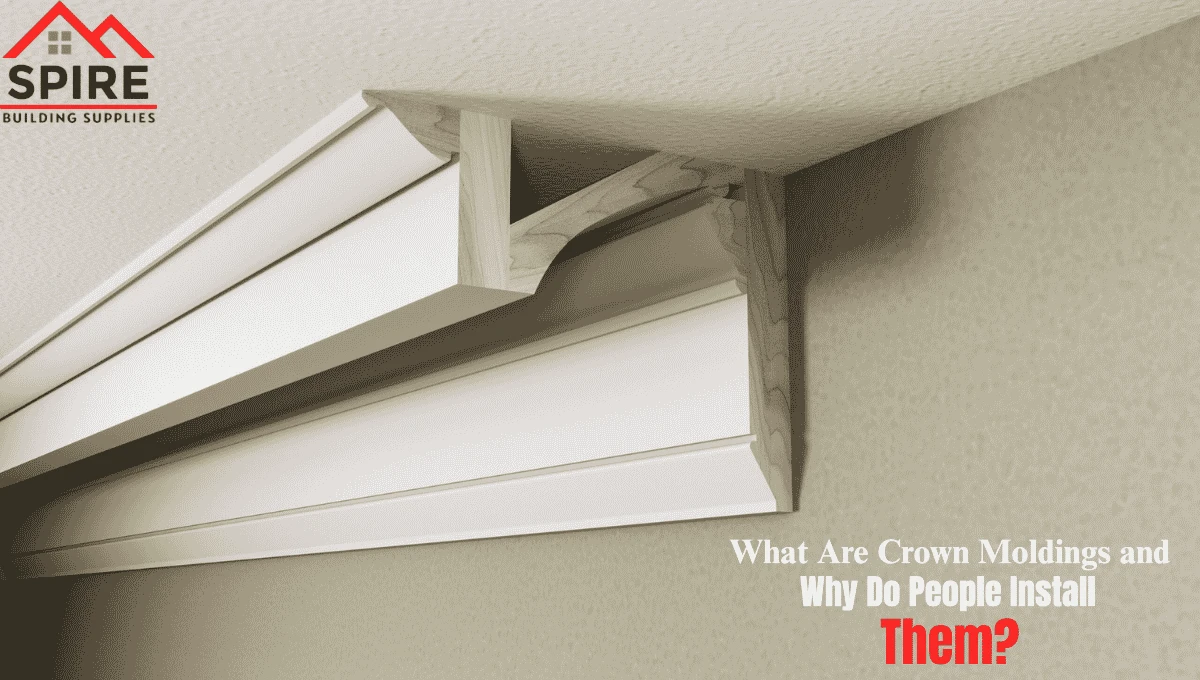
What are crown moldings? They are decorative trim profiles installed where your wall meets the ceiling — and that one simple detail is what separates a finished room from an incomplete one.
You’ve seen it before. A room that just looks right — walls, ceiling, everything tied together with a clean, shaped edge. That’s crown molding doing its job quietly and beautifully.
At Spire Building Supplies, we’ve helped Texas builders, contractors, and homeowners get this detail right for decades. Whether you’re finishing a new build in Dallas or refreshing a living room in Houston, here’s everything you need to know.
What Exactly Is Crown Molding?
Crown molding is a contoured trim profile that bridges the angle between a wall and a ceiling. Instead of leaving that corner bare and sharp, it fills it with a shaped edge — curved, stepped, or concave — that draws the eye upward.
The name “crown” reflects its position at the very top of the wall. Historically reserved for grand estates, today materials like finger-jointed primed pine and MDF make it accessible for everyday residential projects across Texas.
It belongs to the broader family of interior trim millwork – alongside baseboard, door casing, and chair rail. Together, these details define the architectural character of any space.
Why Do People Install Crown Molding?
The reasons go well beyond aesthetics. Texas builders install crown moldings because they deliver real, visible results:
- Creates visual height — Draws the eye upward, making 8- or 9-foot ceilings feel taller and more open.
- Gives a polished, finished look — closes the wall-ceiling gap cleanly, like a frame around a painting.
- Boosts perceived home value — Texas buyers notice interior trim detail and associate it with quality construction.
- Defines architectural style — Classic profiles signal traditional design; cove profiles read as modern and minimal.
- Hides imperfections — Gaps, uneven paint lines, and drywall irregularities at the ceiling junction disappear behind it.
- Works in every room — living rooms, bedrooms, dining rooms, home offices — anywhere walls meet ceilings.
Understanding the Profiles: What the Product Names Mean
At Spire Building Supplies, every product name carries real technical information. Here’s how to read the two most popular crown profiles.
CROWN 4-1/4 X 9/16 FJ 16′ PRIMED — Model 8012FJP
Our most requested profile for residential production work across Texas:
- 4-1/4″ — Face width. The visible profile measures four and a quarter inches — substantial without overwhelming standard ceiling heights.
- 9/16″ — Projection depth off the wall, critical for fitting and fastening.
- FJ (Finger-Jointed) — Short wood pieces precision-bonded end-to-end. Straight, stable, and far more warp-resistant than solid lumber.
- 16′ — Full-length pieces that minimize joints on longer wall runs.
- PRIMED — Factory primer already applied. Skip the prime step on-site and go straight to finishing paint – saving real labor hours.
The 8012FJP is the standard spec for production builders throughout DFW, Houston, and San Antonio. It performs consistently in Texas’s variable humidity – where untreated lumber cups, warps, and costs you time.
CROWN LA5 COVE 17 MM X 4-1/4 MDF 16′
The cleaner, more modern alternative — increasingly popular in transitional Texas interiors:
- Cove — A concave, inward-curving profile. Reads clean and minimal, perfect for contemporary design.
- 17MM — MDF core thickness, determining rigidity and the crispness of the routed edge.
- 4-1/4″ — Same face width as the 8012FJP, ensuring visual consistency across a full project.
- MDF — No grain, no knots, no seasonal movement. Paints out flawlessly with zero grain telegraphing through the finish coat.
- 16′ — Standard length for efficient, minimal-joint installation.
MDF cove crown is the go-to for builders and designers who want a smooth, modern finish that holds up as well in year two as it did on day one.
Crown Molding Materials: Quick Comparison
| Material | Best For | Paint Finish | Moisture Resistance | Cost |
|---|---|---|---|---|
| FJ Primed Pine (8012FJP) | Traditional builds, production | Excellent | Moderate | Affordable |
| MDF (LA5 Cove) | Modern/transitional interiors | Outstanding | Interior only | Affordable |
| Solid Wood | Stain-grade, restoration | Good | Moderate | Premium |
| PVC / Polyurethane | Wet or outdoor areas | Good | High | Moderate |
For most Texas interior projects, FJ-primed or MDF crown is the smart, cost-effective choice.
How Is Crown Molding Installed?
The process is straightforward for experienced finish carpenters:
- Measure the room perimeter in linear feet — add 10–15% for waste from angle cuts.
- Identify the spring angle — typically 38° or 45° depending on the profile.
- Cut corners — inside corners are best coped, not just mitered, especially in Texas homes on clay soil, where walls shift with the seasons.
- Nail the molding to wall studs and ceiling joists using a finish nailer.
- Caulk, fill, and paint — with the primed 8012FJP, skip primer entirely and apply finish coats directly.
Why Texas Builders Choose Spire Building Supplies
Spire Building Supplies stocks what production builders and finish carpenters actually need — in the right profiles, materials, and lengths for real Texas job sites.
We supply contractors, remodelers, and homeowners statewide with:
- Factory-primed FJ crown (8012FJP) for painted production builds
- MDF cove crown (LA5) for modern interiors with a flawless finish
- Complete trim packages — baseboard, casing, and specialty profiles
- Expert guidance on profile selection and quantity estimation
What Texas Customers Say
The primed FJ crown from Spire is consistently straight, takes paint perfectly, and arrives without warping. For production builds in DFW, it’s the only way to go.
Marcus T., Finish Contractor, Fort Worth, TX
Spire had both profiles in stock, staff knew exactly what I needed, and the MDF cove crown was painted flawlessly — the client was thrilled.
Sandra R, Houston, TX
I spec crown moldings from Spire on every project now – stable, smooth, and they save real time.
David H, San Antonio, TX
People Also Ask
What size crown molding is best?
For 8–9 ft ceilings, a 3-1/2″ to 4-1/4″ face width, like the 8012FJP, works perfectly.
Are crown moldings worth installing in Texas homes?
Yes — crown moldings are the highest-impact, lowest-cost finishing detail you can add.
Crown molding vs cove molding?
Crown has compound curves; the cove (LA5) has one concave curve — cleaner and more modern.
Can I paint it after installation?
Yes — primed and MDF profiles are ready for finish coats straight away.
How much do I need?
Measure the perimeter and add 10–15% for waste — Spire’s team can calculate exact quantities for you.
Conclusion
Crown moldings are the finishing detail that separates a renovated room from a truly completed one. Pick the 8012FJP for traditional spaces, or the LA5 MDF Cove for a clean, modern look — both are in stock and ready to ship at Spire Building Supplies.
Shop crown molding at Spire Building Supplies — or contact our Texas team today for product guidance.
About the Author
Published by the Spire Building Supplies team — Texas-based construction supply experts serving builders, contractors, and homeowners across the Lone Star State.